HOW TO ADD AN EVENT TO THE WHAT'S ON CALENDAR
Publishing your event on the What's On calendar is a great way to promote your student group's activities to current and prospective students.
This guide explains how to create a What's On event in eActivities, add an event image, set up registrations or ticket sales, and view attendee sign-ups.
Before you begin
The What's On calendar is best used for events that are open to students, such as:
- Social events
- Beginner or taster sessions
- Workshops and training sessions
- Competitions
- Performances
- Conferences
- Charity and fundraising events
TIP: Create your event as early as possible to give students plenty of time to discover it.
Creating a What's On event
Step 1: Log in to eActivities
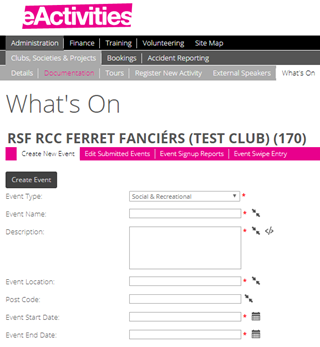
Navigate to: Administration > Clubs, Societies & Projects > What's On > Create New Event
Step 2: Complete the event details
Event Type: Select the category that best describes your event.
Event Name: Choose a clear, descriptive title that includes your student group's name.
For example: Ferret Fanciers Club: Taster Session.
Do not just put "Taster Session" or "Annual Dinner" (Be specific!).
A descriptive event title makes it much easier for students to understand what your event is and helps distinguish it from other events on the calendar.
Description: Provide enough information for students to decide whether they would like to attend. Consider including:
- What the event involves
- Who can attend
- What attendees should bring
- Any costs involved
- Whether booking is required
Event Location: Be as specific as possible. For example: Meeting Room 3, Level 3, Union Building, Beit Quadrangle, South Kensington Campus
NOT JUST: Union Building
Postcode: Use the postcode that matches your event location. SW7 2BB (Events in Union Building), SW7 2AZ (Events in College buildings). If your event is off campus, use the venue's postcode.
Event Start and End Date: Check that the date and time are correct before publishing your event.
NOTE: Once you've completed the event details, three additional tabs will appear:
- Event Images
- Event Signups
- Event Products
Step 3: Adding an event image
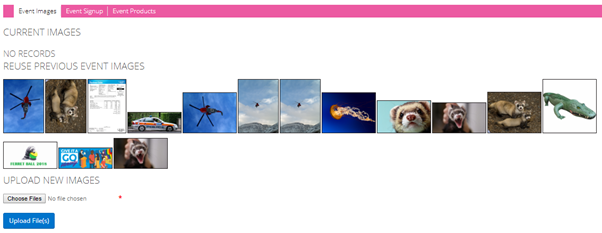
Open the Event Images tab.
You can either:
- Select an existing image, or
- Upload a new image using the Choose Files button.
Choose a clear, high-quality image that represents your event and encourages students to click on it.
Step 4: Setting up event sign-ups
Click the Event Signup tab. Here you can set up a free sign-up list so that you can keep track of people who wish to register for your event/activity.
Complete the following fields:
| Field | Guidance |
| Title | Use the same title as your event. |
| Description | Include any useful information, such as when registrations close. |
| Sign-up Open Date | Choose when students can begin registering. |
| Sign-up Close Date | Choose when registrations close. |
| Maximum Sign-ups | Set a limit that does not exceed your venue capacity. |
TIP: Using a sign-up list helps you estimate attendance and manage venue capacity.
Step 4b: Linking a ticketed event
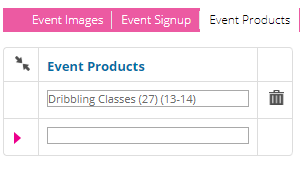
If your event requires students to purchase a ticket, use the Event Products tab instead of creating a free sign-up list.
Simply search for the existing SUMS Shop product you want to link to your event and select it from the drop-down list.
How to check event sign-ups
Step 1: Open the Event Signup Reports
Navigate to: Administration > Clubs, Societies & Projects > What's On > Event Signup Reports
Step 2: Search existing and past events
Browse the list of existing and past events. You will be able to see total sign-ups.
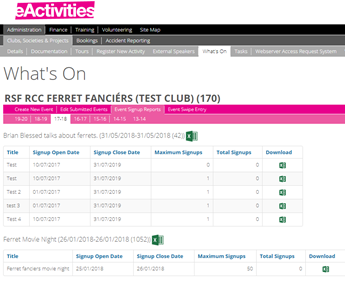
Click the Excel icon to download the sign-up report, which includes the following information:
- Date of signup
- Name
- CID
- Email address
Still have questions? Check out the rest of our Knowledge Base articles or submit a ticket to the Activities Team.
Was this article helpful?
That’s Great!
Thank you for your feedback
Sorry! We couldn't be helpful
Thank you for your feedback
Feedback sent
We appreciate your effort and will try to fix the article